Abstract
Lateral lumbar interbody fusion (LLIF) is a popular technique as it allows for the placement of a large interbody implant through a retroperitoneal, transpsoas working corridor. Historically, the interbody is placed with the patient in lateral decubitus and then repositioned to prone for the posterior instrumentation. While this has been an effective and successful technique, removing the interoperative flip would improve the efficiency of these cases. This has led to modified LLIF approaches including single-position prone LLIF (pLLIF). This modification has shown to be an efficient and powerful technique; however, learning to navigate the LLIF approach in the prone position has its own challenges. The purpose of this article is to provide a detailed description of our pLLIF technique while simultaneously introducing surgical tips to overcome the challenges of the approach and optimize the implantation of the interbody device.
Introduction
Lateral lumbar interbody fusion (LLIF) is commonly used in the treatment of degenerative spine pathologies. Traditionally, the patient is positioned lateral decubitus for interbody placement and then staged or flipped intraoperatively to prone for posterior instrumentation. There has been a recent push to increase surgical efficiency, and surgeons have begun exploring the idea of performing the entire procedure in a single position.1,2 Recent studies have shown that single-position prone LLIF (pLLIF) has increased surgical access secondary to posterior migration of the femoral nerve, increased passive distal lordosis from positioning, and improved surgical efficiency when placing or revising posterior hardware.3,4 Prone positioning also allows for the seamless addition of adjunctive procedures such as direct decompression or osteotomies. A key disadvantage to pLLIF is the introduction of gravity as a new variable that can alter the traditional feel of lateral interbody work.5,6 The key to successfully overcoming this learning curve is a thorough understanding of the specific surgical nuances of a pLLIF. The purpose of this report is to create a clear, step-by-step description of single-position pLLIF and provide our insights into these challenges to help reduce the surgeon’s learning curve.
Single-position pLLIF Surgical Technique
Patient Positioning
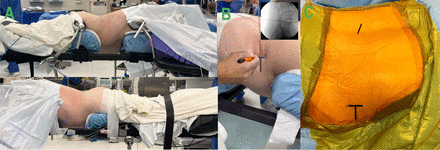
After induction of general anesthesia, the patient is positioned prone on a Jackson table. The hips and knees are extended using pillows below the knees; this positioning allows the surgeon to induce more distal lumbar lordosis if needed. The abdomen should hang freely toward the floor, helping to reduce the flank-to-spine distance. To allow for improved lateral access at L4-L5, center the hip pad over the greater trochanter (Figure 1). Orthopedic hip bolsters, at the hip and chest, are applied on the contralateral side of the patient. Under fluoroscopic guidance, the disc space is marked in the anteroposterior (AP) and lateral planes.
(A) Patient positioning on Jackson table. (B) Drawing the surgical incision. (C) Surgical draping for both lateral and posterior work, with incisional markings outlined.
Surgical Approach
A 2-inch lateral incision in line with the disc space is made for single-level cases or posterior-proximal to anterior-distal for multilevel cases. Electrocautery is used through the subcutaneous tissue, the obliques are bluntly dissected, and the transversalis fascia is penetrated using the index finger. With the wrist supinated, make a large sweeping motion with the index finger to release the peritoneum from the retroperitoneal space. This sweeping motion should be performed with the finger adjacent to the quadratus lumborum and/or the transverse process. The peritoneum will fall ventrally, thus providing adequate access to palpate the psoas muscle from dorsal to ventral. With the ventral surface of the psoas located, the initial dilator is introduced via the flank incision and docked onto the surface of the muscle without penetrating it. The position of the dilator is checked with AP and lateral fluoroscopy to ensure appropriate targeting of the disc space, aiming 2/3 from the posterior border of the disc space on the lateral.
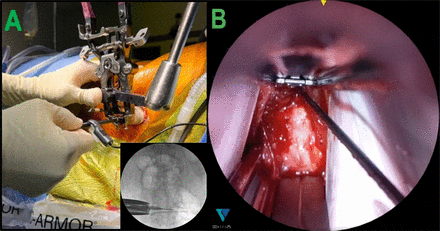
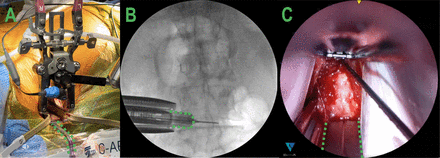
The dilator is then advanced through the psoas muscle at a ventral to dorsal angle toward the midpoint of the intervertebral disc. Once the disc space is palpated with the dilator, a dilator measurement is used to build the retractor with appropriately sized blades. We use blade lengths 10 mm beyond the skin surface, so the flank tissue is not generating a force to back the retractor out once anchored. Triggered electromyography (t-EMG; EMG) is used to confirm favorable anterior and posterior EMG numbers. Gentle posterior migration of the dilator is pursued, while touching the disc space, under continuous t-EMG monitoring and fluoroscopic guidance until the dilator is around the posterior third of the disc space. The goal is to place a 22-mm-wide implant each time. The angle of the dilator is then straightened to make it orthogonal to the disc space. The Kirschner wire (K-wire) is introduced to capture the disc space. Sequential dilators are placed over the initial dilator to expand the opening through the psoas. After the appropriate blade lengths are attached to the retractor, the retractor is covered with the fingers of a number 9-sized glove (Figure 2). The retractor is then placed over the dilators and aligned as best as possible to be collinear and orthogonal to the disc space by ensuring the retractor is parallel to the floor. After adequate positioning is obtained, the retractor is then secured to the Jackson frame via the articulating arm on the ipsilateral surgical side. The retractor is opened 2 clicks cranial-caudal and 2 clicks anterior-posterior. The two largest dilators are removed, and the smallest dilator is kept in place. The surgical corridor is checked again to ensure there are no neural structures within the working field. It is okay if the nerve is located posterior to the retractor and low EMG numbers are reported. The t-EMG is used to stimulate the posterior blade, ensuring the low numbers are posterior to the posterior blade. The inner surgical corridor is then stimulated by placing the EMG clip onto the initial dilator (still in place over the K-wire) and measuring nerve proximity within the surgical corridor (Figure 3). It is crucial that there are no low readings (<10) within the surgical corridor. Next, the disc shim is placed along the anterior track located on the posterior blade. Once the retractor is in place, the retractor lights are attached, and the retractor is opened anteriorly to accommodate a 22-mm-width implant.
(A and B) Fingers from a number 9-sized glove covering the retractor blades before insertion. (C) Demonstration of retroperitoneal fat in the visual field without the use of the glove barrier. (D) Visualization of the surgical corridor when the gloves are around the retractor blades, and fat creep is minimized.
(A) Neural mapping conducted by stimulating the posterior blade and black dilator. The dilator is rotated within the surgical corridor to ensure a safe working zone both posterior and anterior within the retractor.(B) Placement of the dilator in the surgical field.
Disc Space Preparation and Implantation
To begin disc preparation, a Cobb elevator is used to establish a plane ventral to the anterior border of the disc space and posterior to the ventral great vessels. In a slow methodical small twisting motion, a Cobb is used to sweep any muscle that overlays the disc space until the Cobb falls ventral to the disc space within the fat plane. If there are no large osteophytes, the curve of the anterior disc is appreciated before it falls off. The Cobb that is seated along the fat plane is then exchanged for a long anterior longitudinal ligament (ALL) retractor with a straight tip to ensure there is always visualization of the anterior margin of the disc space for discectomy, endplate preparation, trialing, and final implant placement (Figure 4). At this point, a safe ventral to dorsal working zone has been established between the ALL retractor and the posterior shim. The retractor handles are perfectly vertical to the floor with a perfect AP of the disc space confirmed. This ensures that the retractor is orthogonal to the disc space. The surgical rep is positioned at the foot of the bed to confirm the retractor orientation. Once the retractor is locked in perfectly orthogonal to the disc space, the bed is rotated approximately 5° to 10° away from the surgeon.
(A) The surgeon’s view of the retractor with the posterior intradiscal shim and anterior longitudinal ligament (ALL) retractor in place. (B) Anterior-posterior view of the retractor, ALL retractor (outlined in green), and posterior shim docked at the L4-L5 level. (C) View of the surgical corridor highlighting the placement of the ALL retractor (outlined in green).
Surgery continues with a wide annulotomy followed by separation of the disc from the bony endplates using a Cobb working in a posterior trajectory toward the posterior shim and then leveling out orthogonally after 15 to 20 mm. Great care is taken to avoid endplate violation and to ensure an adequate contralateral release of the annulus. These steps are confirmed with fluoroscopy. Using a boxcutter, the majority of the disc is removed. Trial implants are then placed under fluoroscopic guidance until the desired height and segmental angle are obtained. A large pituitary and ring curette is used to remove the remaining disc, followed by a rasp for final decortication. The permanent implant with bone graft is then tamped into the final position. Care is taken to maintain an anterior cuff of annulus/ALL tissue during disc prep so as not to rupture the ALL, which creates a very unstable environment. After proper positioning of the implant is seen on fluoroscopy, the retractor is removed carefully and slowly to see whether there is any active bleeding or any obvious issues.
In most cases, we then proceed with posterior pedicle screw instrumentation through a traditional minimally invasive approach utilizing a Wiltse incision.
Scenarios and Surgical Tips and Tricks
In addition to our outlined surgical technique, we have come up with 5 tips and tricks to improve the learning process (Table).
Summary of the scenarios encountered during a prone lateral lumbar interbody fusion and suggested surgical tips and tricks to overcome them.
Retroperitoneal Fat in the Surgical Corridor
The lateral transpsoas technique consists of accessing the spine by placing a retractor through a retroperitoneal corridor.7 When the retractor is opened, retroperitoneal fat can creep into the surgical field and can obstruct the surgeon’s view of the disc space. Continuing the procedure may result in an increased risk of a surgical complication, and attempting to remove the adipose tissue risks injuring the peritoneum. To overcome this obstacle, we have performed all of our pLLIFs with our gloved retractor modification. Before retractor placement, the fingers of a number 9-sized glove can be cut and placed over the retractor blades (Figure 2). We place the middle 2 fingers for blades <130 mm, and all 3 fingers overlapped for retractor blade lengths 130 to 180 mm. This creates a barrier between the unwanted retroperitoneal fat and other contents from entering the surgical corridor in either lateral LLIF or pLLIF.
Neural Mapping and Safe Introduction of Intradiscal Shim
The lumbar plexus and its branches are at risk of injury while traversing the psoas muscle.8,9 The t-EMG can be utilized during an LLIF to understand the locations of the nerves and create a safe passage through the psoas.10 In the prone position, the lumbar plexus has a tendency to migrate more posteriorly.11 After safe passage of the initial K-wire, sequential dilators, and retractor placement, stimulating the posterior blade with directional t-EMG and analyzing threshold responses can determine whether safe passage can be obtained. The retractor can be opened in 2 ratcheting steps in the cranial-caudal and ventral-dorsal directions, providing a corridor to remove the 2 largest dilators and insert the posterior disc shim. Prior to shim placement, we stimulate the posterior blade and inside of the partially opened retractor. Low numbers at the posterior blade electrode are indicative of the nerve located posterior to the retractor, which is desired. We use the black (first) dilator with the directional t-EMG electrode attached to it to determine whether the nerve is located within the retractor. Spinning the black dilator functions as the probe to evaluate for nerves within the retractor blades in all 4 quadrants (Figure 3). If the posterior blade registers a low reading and the black dilator registers a high reading both anterior and posterior (>15 mAMPs), we place the intradiscal shim. If at any time the black dilator registers a low number (<10 mAMPs), we assume the nerve is located within the retractor corridor. We would then remove the retractor and wire and redock to a new position, likely a little more anterior, or abort the procedure if a higher value is unattainable. Safe introduction of the posterior intradiscal shim can be performed with the black dilator in place. The radius of the black dilator is approximately 2 mm, so introduction of the posterior shim over the dilator will result in the shim placement approximately 2 mm behind the K-wire. Consequently, if the black and purple dilators are kept, the shim will be 4 or 6 mm behind the K-wire, respectively. Our experience with this technique has shown that this is a reproducible step for safe and predictable posterior shim placement.
Ventral Migration of Distal Retractor While Performing an LLIF in the Prone Position
During pLLIF, gravity acts to displace the retractor ventrally, causing two main modes of failure. The first is the pistoning effect of the retractor while working in the disc space; this can cause motion in the medial to lateral direction that may dislodge the retractors’ contact with the spine. The second mode of failure, and the most frequently seen, is that the posterior blade can deflect ventrally into the disc space during the discectomy work. If not identified right away, ventral migration of the posterior blade reduces the working corridor. All the disc prep tools are now working in the more ventral space, which increases the risk of injury to the ALL, great vessels, and/or bowel. To avoid the pistoning effect, the contralateral bolsters/tape and the intradiscal shim are in place each time. To identify ventral migration of the posterior blade and a reduced working corridor, we use a fourth blade (ALL retractor) every time we perform the lateral technique in the prone position. Distal fixation of the retractor can be accomplished using a posterior intradiscal shim and ALL retractor (Figure 4). The ALL retractor is placed to clearly visualize the anterior border of the disc space to avoid inadvertent ALL ruptures in the setting of loss of retractor position/ventral posterior blade deflection. The ALL retractor rests against the ventral surface of the ALL and will not translate ventral during the discectomy procedure. With the ALL retractor and posterior shim in position, there are well-defined anterior and posterior working borders while performing disc prep.
Improving Surgical Ergonomics in the Prone Position With Bed Rotation
Once familiarity is obtained while performing a pLLIF, bed rotation can be incorporated to improve surgeon ergonomics. After the retractor is docked, appropriate positioning is confirmed with fluoroscopy, the bed can be rotated approximately 5° to 10° away from the seated surgeon until the surgeon has a good view down the surgical corridor without bending their neck (Figure 5). Proper contralateral bolster positioning is important during this step to ensure the patient does not slide away from the surgeon on the bed. When performing disc work while the bed is rotated, the reference angle becomes the 90° angle between the retractor handles and the instruments. Having a surgical assistant or medical device representative at the foot of the bed checking to make sure this angle is maintained is required for reproducibility of implant position.
(A) Side view of the surgeon having to bend their neck to view down the surgical corridor. (B) Improved ergonomics and visualization can be achieved by rotating the bed approximately 5° to 10° away from the surgeon.
High Iliac Crest While Performing an L4-L5 pLLIF
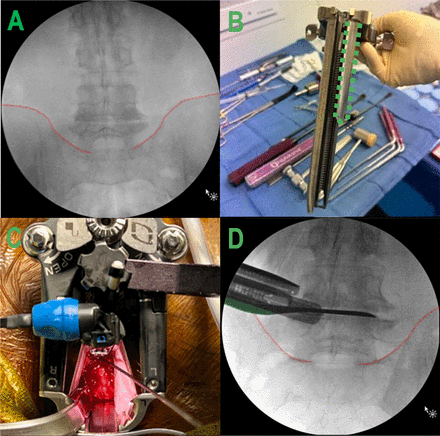
Safely and effectively accessing the L4-L5 lumbar segment during a pLLIF can be challenging due to factors such as the ventral location of the lumbar plexus, proximity of the anterior disc and vessels, and a high iliac crest. Introducing pelvic obliquity by breaking the patient coronally can help with L4-L5 access. Angled instruments are beneficial when performing disc prep in patients with high iliac crests of proximal lumbar segments. To navigate the high pelvic crest, change the most caudal blade of the three-blade retractor system to the shortest blade available (size 90 mm). Upon appropriately opening the retractor, the short caudal blade will not push off the iliac crest while providing a surgical corridor to the disc space around the crest (Figure 6).
(A and B) A high iliac crest extending to the inferior border of the L4 pedicle can be circumvented using a retractor setup with a caudal 90-mm blade (outlined in green). (C and D) The short caudal blade allows the retractor to open without pushing against the iliac crest.
Conclusion
Single-position pLLIF is a nuanced technique that may present with many challenges in the early learning period. Understanding the different surgical situations and potential complications and having a plan to approach them may aid the initial learning curve while improving ergonomics and workflow to efficiently incorporate single-position pLLIF into a surgeon’s practice.
Footnotes
Funding The authors received no financial support for the research, authorship, and/or publication of this article.
Declaration of Conflicting Interests The authors report no conflicts of interest in this work.
Disclosures Michael McDermott, Michael Rogers, Robert Prior, and Rebecca Michna have nothing to disclose. Alfredo Guiroy is a teacher for AO spine. Jahangir Asghar is a consultant for NuVasive, SeaSpine, Globus, and Medtronic and teaches for Medtronic. Ashish Patel is a consultant for Stryker and NuVasive, receives royalties from NuVasive and ATEC, and has received a grant from NuVasive.
- This manuscript is generously published free of charge by ISASS, the International Society for the Advancement of Spine Surgery. Copyright © 2024 ISASS. To see more or order reprints or permissions, see http://ijssurgery.com.
